

These chickpea waffles, made from chickpea flour, are fluffy, tender, and incredibly delicious. You only need four simple ingredients and 30 minutes to make this recipe. They are great for both sweet and savory fillings!

I love a hearty and decadent stack of waffles for breakfast! While protein waffles are a great option, not everyone has protein powder in their pantry. Hence, I am excited to share these chickpea waffles that are nutritious, filling, and naturally high in protein.
Due to its versatility, chickpea flour is one of my favorite gluten-free flour to work with. It can be used to make both sweet and savory recipes, such as banana chickpea pancakes and chickpea flour tortillas. If you want to make something new with chickpea flour, these chickpea waffles will surely become a breakfast favorite!
Jump to:
💚Why you will love this recipe
- A 4-ingredient recipe that is super easy to prepare
- Highly versatile and can be served sweet or savory
- Filling and high protein - each waffle contains around 10g of protein!
- Meal-prep friendly and freezable
🧂What you will need

📃Ingredients notes and substitutions
- Chickpea flour - This can be substituted with gram flour. I purchase Anthony's chickpea flour online, but you can find it in groceries or your local health food store.
- Salt - Omit if you are planning to make sweet waffles.
- Other add-ins - This is just the base recipe, so feel free to add other ingredients that sound good! For sweet waffles, you can use vanilla extract, sweetener of choice, spices (such as cinnamon and pumpkin spice), or chocolate chips. As for savory waffles, feel free to add seasonings such as garlic powder, onion powder, or black pepper.
🔪How to make

Combine chickpea flour, baking powder, and salt in a large mixing bowl.

Mix well. Next, add water, and stir until a smooth batter forms. Let the batter rest for 10-15 minutes.
Save this recipe!
Also get a FREE high-protein vegan recipe eBook + weekly new recipes! Unsubscribe anytime.

In the meantime, preheat your waffle iron to medium-high. Grease the plates with some oil. Pour about ½ cup of batter into the waffle iron (or the amount indicated in the manufacturer guide), and cook until the indicator switches off.

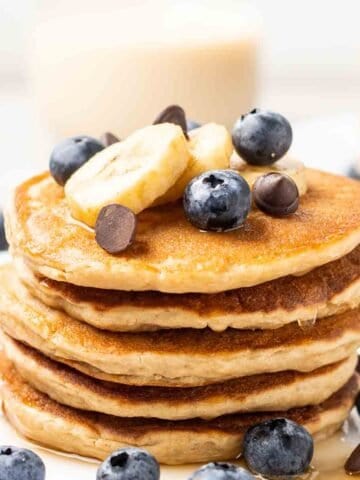
Serve chickpea waffles with either sweet or savory toppings, and enjoy!
✔Helpful tips
- Preheat and lightly grease the waffle iron - A preheated waffle iron ensures even cooking and reduces batter sticking. Lightly greasing the plates with spray oil or brushing on oil further prevents sticking.
- DO NOT skip resting the batter - Resting the batter for 10-15 minutes ensures that chickpea flour is properly rehydrated, yielding moist and tender waffles.
- Gauging the doneness of waffles - If you are using waffle makers with an indicator, simply cook until the indicator switches off. For waffle makers without an indicator, observe the steam. Waffles are done cooking when the steam significantly reduces.
- Customize this recipe - Feel free to add ingredients that sound good to your chickpea flour waffles. Some good ingredients for sweet waffles include vanilla extract, chocolate chips, blueberries, and spices. To make savory waffles, you could stir in savory seasonings (such as garlic powder or black pepper), chopped chives, or shredded cheese.

🍌Serving ideas
As mentioned above, these chickpea waffles can either be enjoyed sweet or savory. Here are some of my go-to toppings in each category:
Sweet toppings
- Spreads - Such as Nutella, nut butter (especially peanut butter), chocolate hummus, or cookie dough hummus.
- Fruits - Sliced bananas, caramelized apples, berry compote, or fresh berries are some great choices.
- Yogurt - Any plant-based or dairy yogurt will work! I prefer Greek or vanilla soy yogurt due to their higher protein content.
- Dessert waffles - To serve them for dessert, add a scoop of your favorite ice cream. Whipped cream is another great alternative!
Savory toppings
- Sausages or bacon - Use your favorite brand of sausage or bacon! As a vegetarian, I usually opt for my vegan andouille sausages or seitan bacon.
- Vegetables - Such as sliced avocado, salsa, or sauteed spinach.
- Eggs - You can pair it with almost any style of eggs. For a plant-based option, you can use my silken tofu scramble or JustEgg.
- Savory spreads - Such as paprika hummus, guacamole, or cream cheese.
❄Storing suggestions
Fridge - Store waffles in an airtight container, and they will last for 3-4 days.
Freezer - Store waffles in freezer bags or containers, layering a sheet of parchment paper in between to prevent them from sticking. They can be frozen for 3 months.
Reheating - When ready to enjoy, simply heat frozen chickpea waffles in a toaster for 2-3 minutes. You can also heat them in the oven for 5-10 minutes or until hot.
❔Commonly asked questions
Chickpea flour is simply made from ground-up dried chickpeas.
These waffles are naturally gluten-free, as chickpea flour is free from gluten. However, as cross-contamination might occur during processing, make sure to get chickpea flour that is certified gluten-free.
I do not recommend substituting chickpea flour with all-purpose flour in this recipe. Both flours have different absorbancies and characteristics. Hence, a 1:1 substitution might not be suitable.
To keep waffles crispy before serving, place them on a wire rack in a single layer in an oven preheated to 100C/200F. Do not stack cooked waffles together, as the steam generated will cause them to turn soggy.


📖 Recipe

Chickpea Flour Waffles
Equipment
Ingredients
- 2 cups chickpea flour
- 2 teaspoons baking powder
- pinch of salt
- 1 cup water
Instructions
- In a mixing bowl, combine together chickpea flour, baking powder, and salt. Stir until everything is well incorporated.
- Next, add water into the bowl. Whisk until a relatively smooth batter forms.
- Let the batter rest for about 10-15 minutes.
- In the meantime, preheat your waffle iron. Grease the plates by brushing or spraying on some cooking oil.
- Give batter a stir, adding a splash of water if it is too thick. Batter will be on the thicker side, but still pourable.
- Pour in about ½ cup of batter (or as needed), and cook until the indicator light switches color. Alternatively, wait until steam stops dissipating out from the waffle maker.
- Repeat for the remaining batter, and serve with whatever you fancy!
Notes
- Preheat and lightly grease the waffle iron - A preheated waffle iron ensures even cooking and reduces batter sticking. Lightly greasing the plates with spray oil or brushing on oil further prevents sticking.
- DO NOT skip resting the batter - Resting the batter for 10-15 minutes ensures that chickpea flour is properly rehydrated, yielding moist and tender waffles.
- Storing - Waffles can be refrigerated for 3-4 days or frozen for 3 months. Reheat in a toaster for 2-3 minutes or oven for 5-10 minutes.
Save this recipe!
Also get a FREE high-protein vegan recipe eBook + weekly new recipes! Unsubscribe anytime.
Nutrition
Nutrition info calculated is just a rough estimate and is provided as a courtesy. Bear in mind that value will vary based on variables like specific brand or type of product used. To obtain the most accurate representation, it is highly recommended that you calculate it on your own with the actual amount and type of ingredient used.


Bob says
I'm not sure about the flour/water ratio. 2 cups of chickpea flour to 1 cup of water made a pretty stiff dough! I didn't pack the chickpea four, so that shouldn't have effected it. I upped it to almost 2 cups of water and had a workable batter.
Jim Mee Sha says
Hi Bob! I am using a local brand chickpea flour to make this recipe, which might be made from a different variety of chickpeas compared to yours. As different types of chickpeas have different absorbency, this might be one of the main reason why you need more water for your batter.
Pamela says
Can you please list weights for the flour in the recipe? You say to weigh it but it's not clear how much to do.
Jim Mee Sha says
You can simply toggle on the metric button to change the measurements to weight. 😁
T says
I wanted to make a sweet waffle so I omitted the salt. I added 1tsp of vanilla and a sprinkle of organic raw cane sugar. I also halved the recipe. The chickpea flour had a very strong flavor and honestly the only thing that helped was adding strawberry chia smash...a lot of it. My 1 yr old and 3 yr old enjoyed it with cinnamon sprinkled on top and agave syrup. I plan to make this again, only half, but add more vanilla and sugar. I hope that helps. Otherwise they came out nice.
Genna says
I made these late last night and they came out great! Only problem is I accediently left them out of the fridge overnight. They were in a sealed container but my guess is they are not safe to eat now? What would you say? Thank you!
Meesha says
I think they are still good to eat, but they might be a little dry.
Vicky says
What could I use instead of the coconut flour?
meesha says
Almond flour will work too ! Or, you can simply just omit it and use less liquid. 🙂
Jubilee says
I came here from yummly and the ingredients were
1 cup chickpea flour
2 Tbsp. coconut flour
1 ripe banana (medium)
1 tsp. baking powder
1 cup soy milk (or any other plant based milk)
2 tsp. apple cider vinegar
1 tsp. vanilla extract (optional)
I am confused. Where are the banana, the soy milk, the apple cider vinegar, and the coconut flour??? The previous comment and reply made me think that the coconut flour and therefore the other ingredients existed. But I'm not sure where or how, help???
Meesha says
Hi Jubilee! This recipe was updated last year, and this revised recipe does not require banana and coconut flour. Hope this helps!
Valentina says
I just made it!!! The best waffle ever ate! So simple to prepar and yet sophisticated in the taste! Delicious!!!
Janelle says
Do you know how many grams of protein are in a serving?
meesha says
I am going to update this recipe as this whole recipe realistically only serve 1, so it is about 20g of protein ! 😊
Jackie says
Exactly! I wish ppl would post it in grams opposed to serving! Grams is accurate than serving!
meesha says
I will definitely keep that in mind for my future recipes ! Thanks for the feedback
Allyson says
The recipe calls for smashed banana but it’s not listed under ingredients. How much/many bananas did you use for this recipe?
I’m always looking for ways to add more protein into my plant based diet. Can’t wait to try it!
Meesha says
Sorry about that ! I had updated the recipe and u will need 1 medium ripe banana. Enjoy !!