

These vegan lumpia Shanghai (Filipino spring rolls) are crispy on the outside and filled with a mouthwatering, meaty filling. Ready in 30 minutes, it's the perfect appetizer to serve at parties, potlucks, or gatherings.
Other than these vegan lumpia, I also love serving my air fryer oyster mushrooms, vegetable lumpia, or vegetable kimbap as an appetizer when entertaining.

When I was young, I had a Filipino housekeeper who often encouraged me to join her in the kitchen. One of the tasks that younger me absolutely loved was wrapping lumpia!
After I became a vegetarian, I really missed this comforting dish, and vegan versions are almost impossible to find. After a few tries, I finally came out with a vegan lumpia recipe that tastes just as good as the one I grew up with.
This recipe is highly versatile and easily pairs well with any Asian mains, including vegan laksa and Hoisin tofu.
💚Why you will love vegan lumpia
- Perfectly crispy on the outside with a juicy and flavorful vegan 'pork' filling
- A great appetizer for entertaining - even non-vegans will be impressed!
- Can be baked, air-fried, or deep-fried
- Prep it ahead of time and freeze until ready to serve!
🧅What you will need

- Plant-based ground - I am using Omnimeat mince (an Asian brand), but any vegan minced, including Impossible Foods or Beyond Meat ground, would work.
- Wrappers - Use lumpia wrappers or small spring roll wrappers. If using frozen wrappers, allow them to thaw overnight in the fridge before using.
✨Ingredients substitutions and variations
Plant-based ground - Can be substituted with 1 block of extra-firm tofu. Crumble it finely and season generously with soy sauce, salt, and pepper as it is tasteless on its own.
Make it gluten-free - Replace lumpia wrappers with 6-inch small rice papers and use a gluten-free soy sauce. Rice papers are slightly more challenging to work with, but you will get the hang of it after a few tries.
Add vegetables - For more texture, stir in other finely chopped veggies into the filling, such as water chestnuts, cabbage, celery, or onion.
🔪How to make vegan lumpia
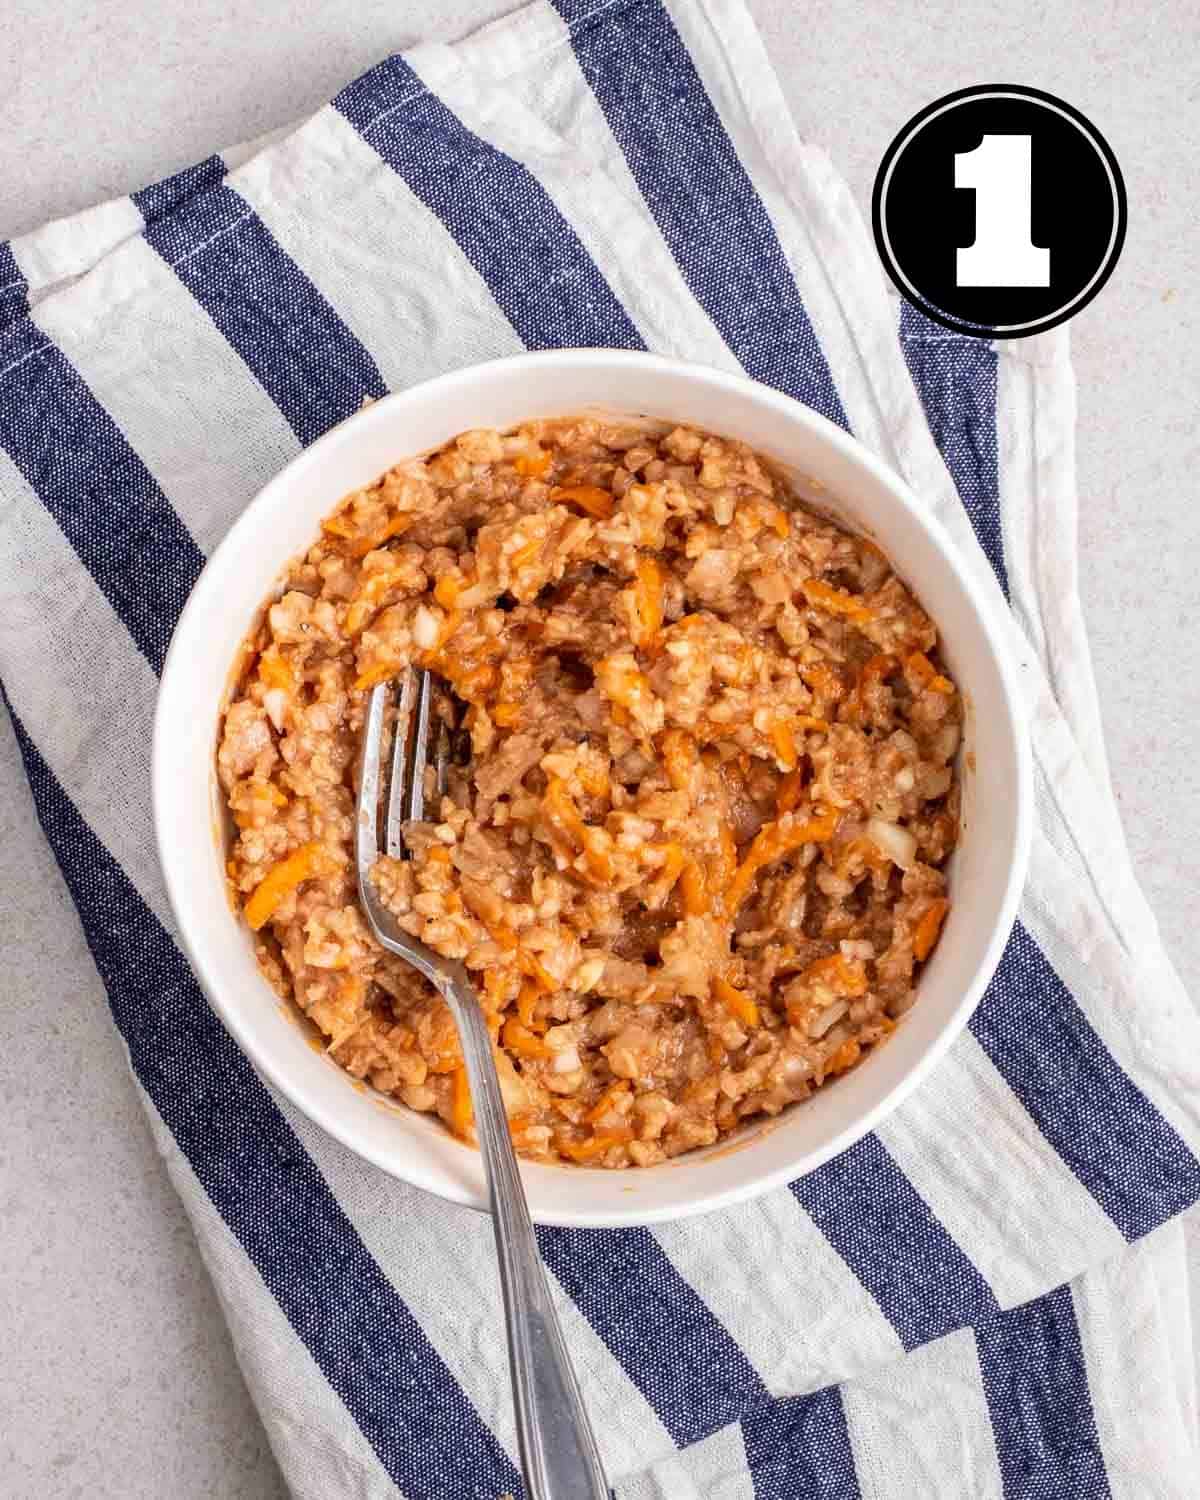
Step 1: Mix all the ingredients for the filling in a bowl and mix well.
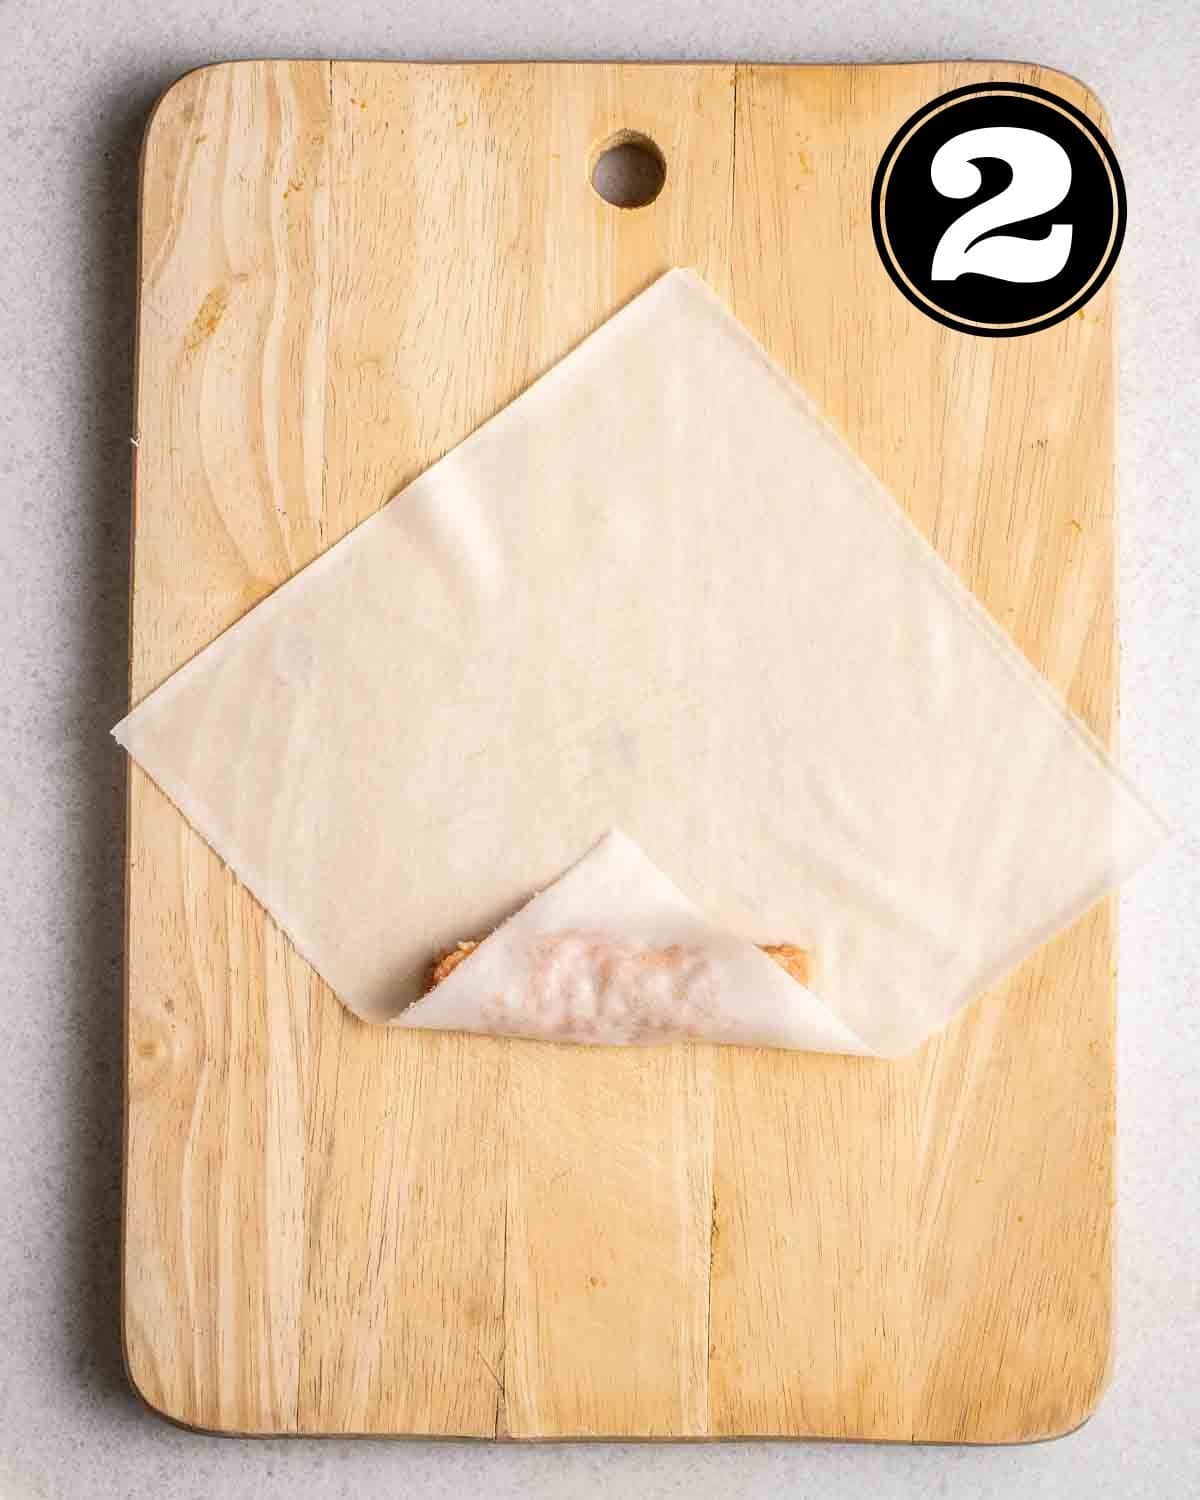
Step 2: Spoon 2 tablespoons of the filling onto the wrapper and shape it into a cylinder. Then, fold the corner facing you over the filling.
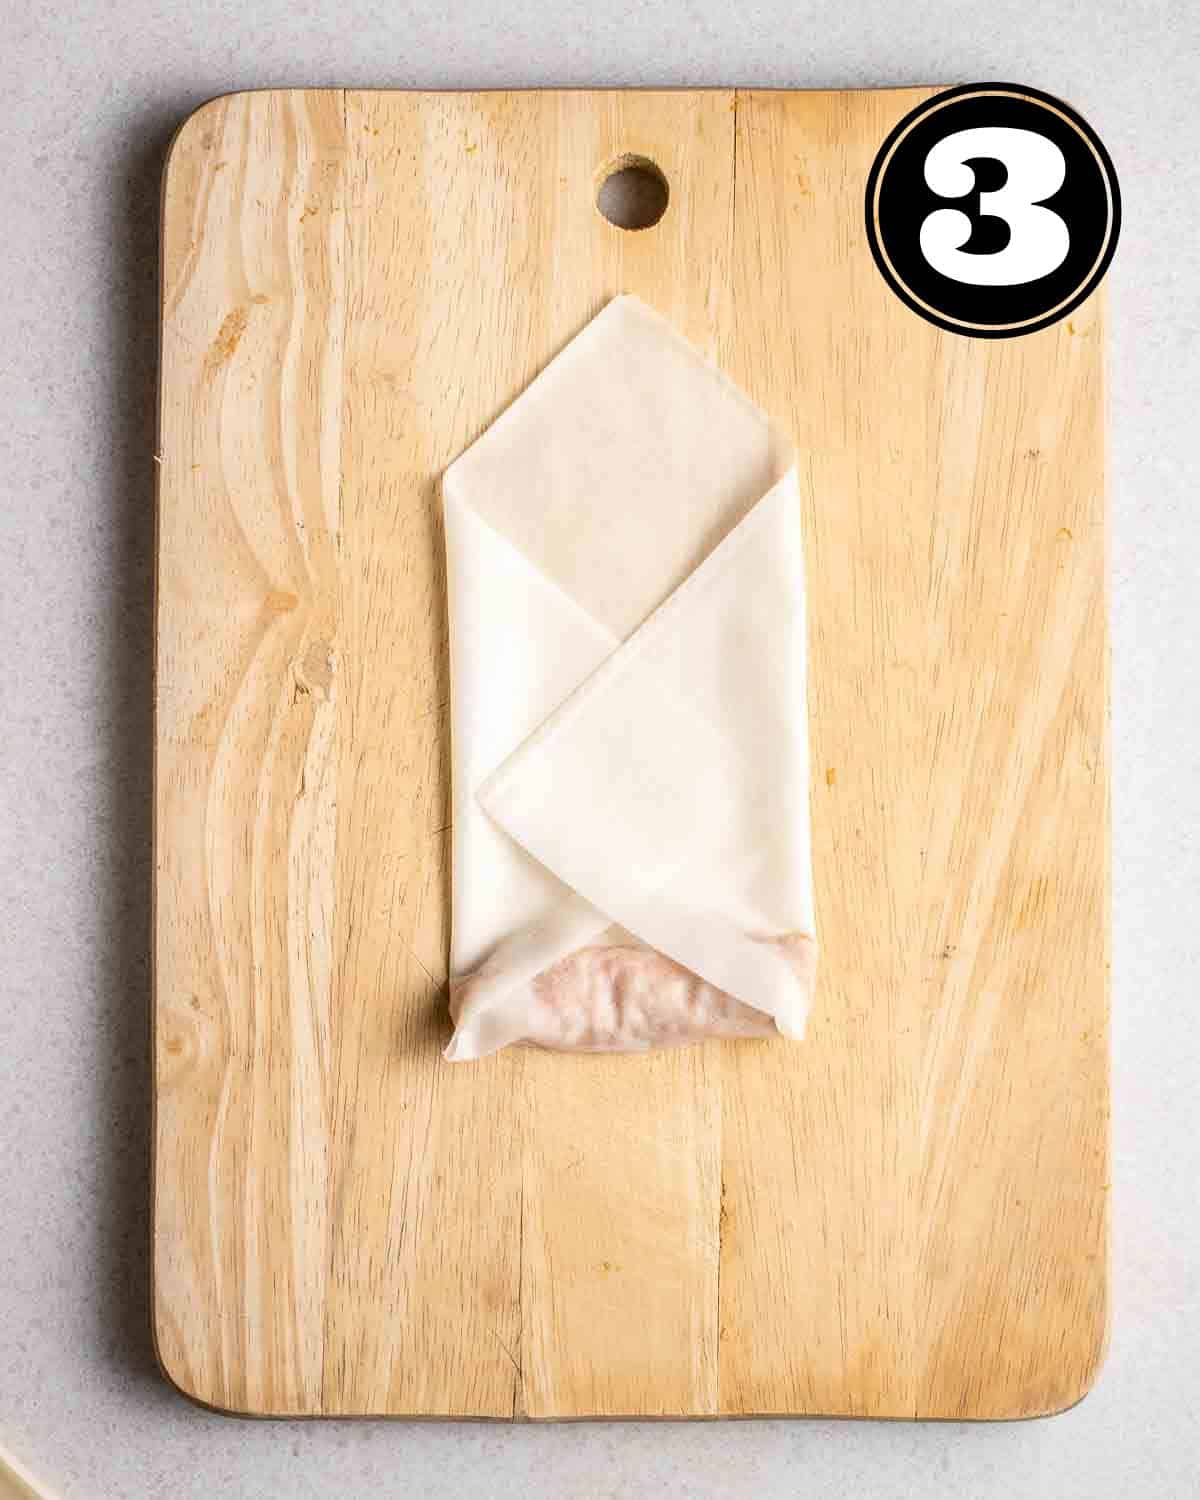
Step 3: Next, fold both edges inwards.
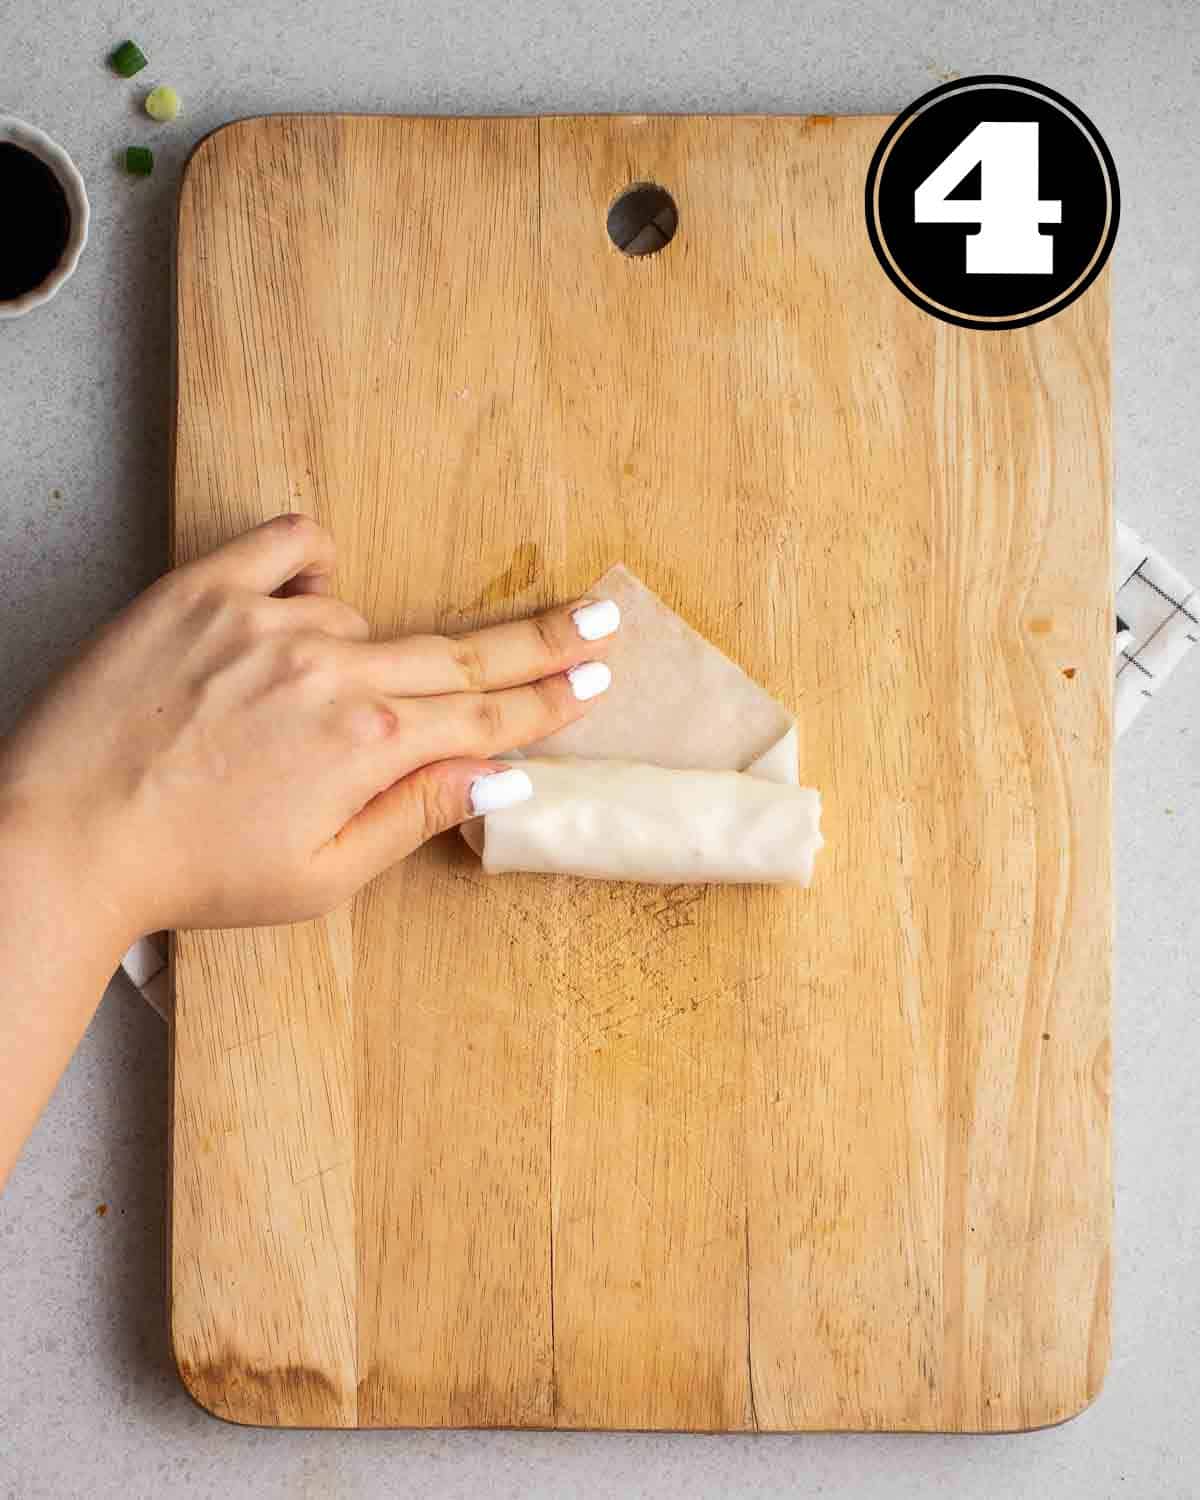
Step 4: Tightly roll it up into a log. Lightly dampen the last inch of the wrapper, then seal it.
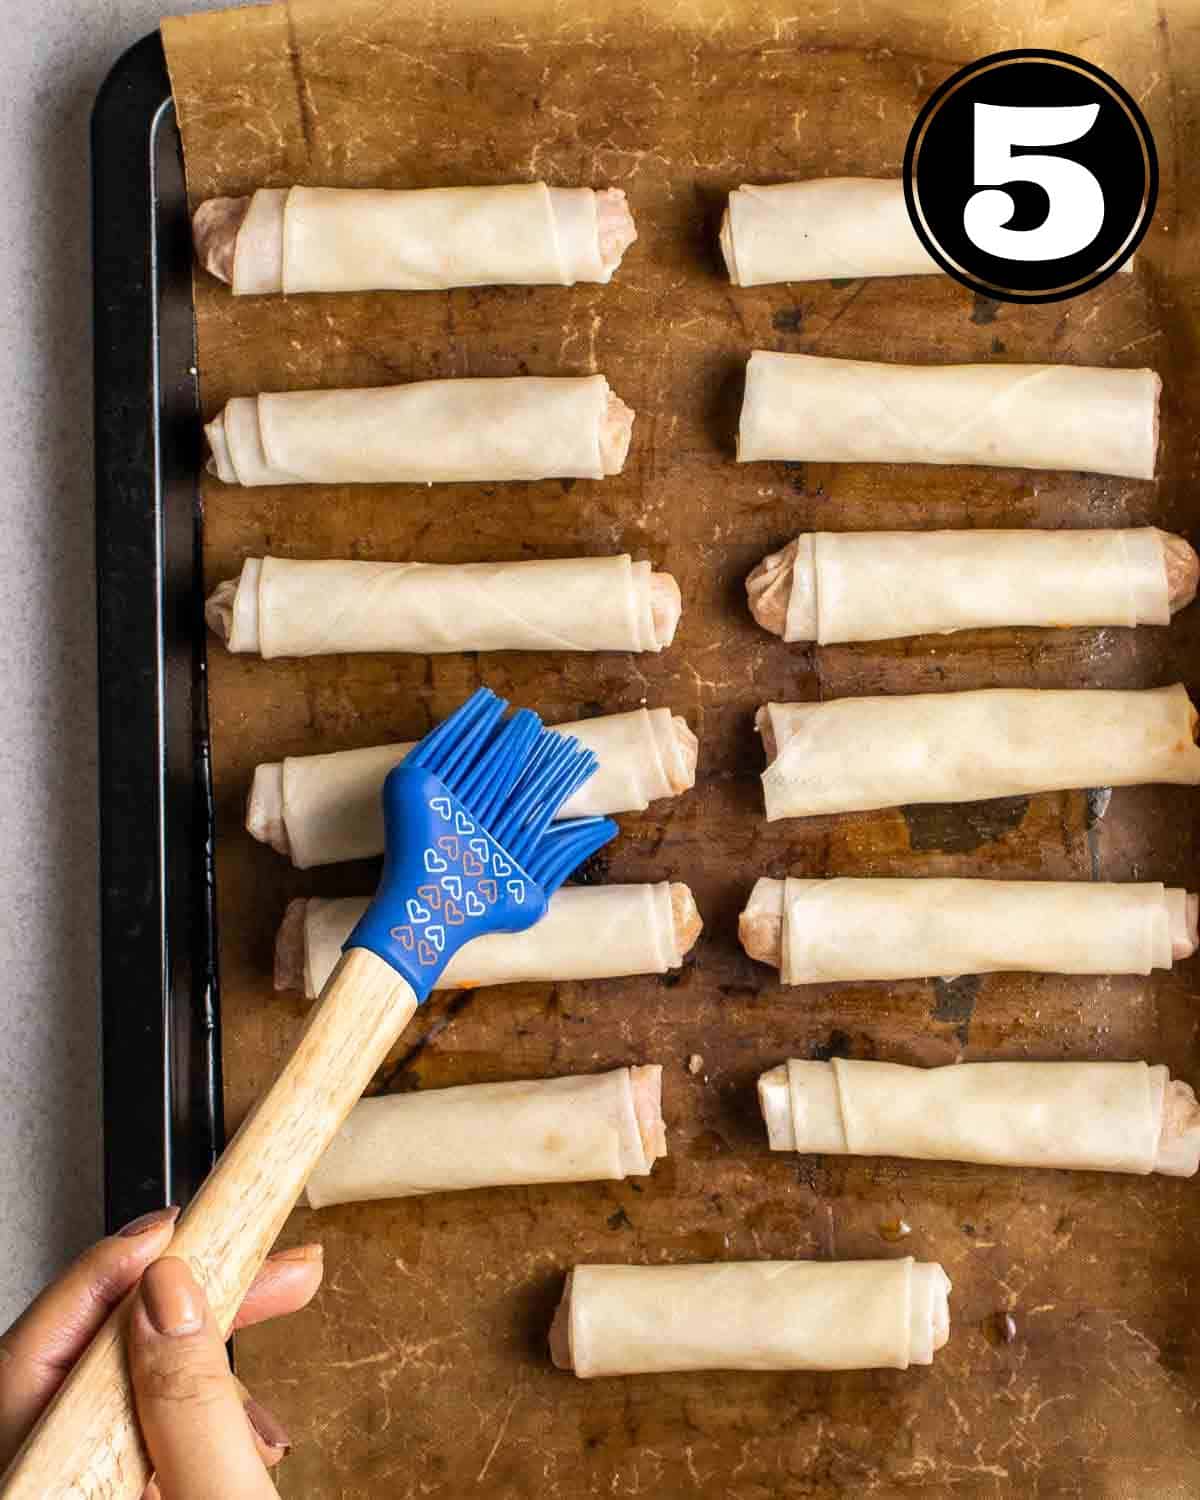
Step 5: Arrange lumpia onto a lined baking sheet and lightly brush some oil on them.
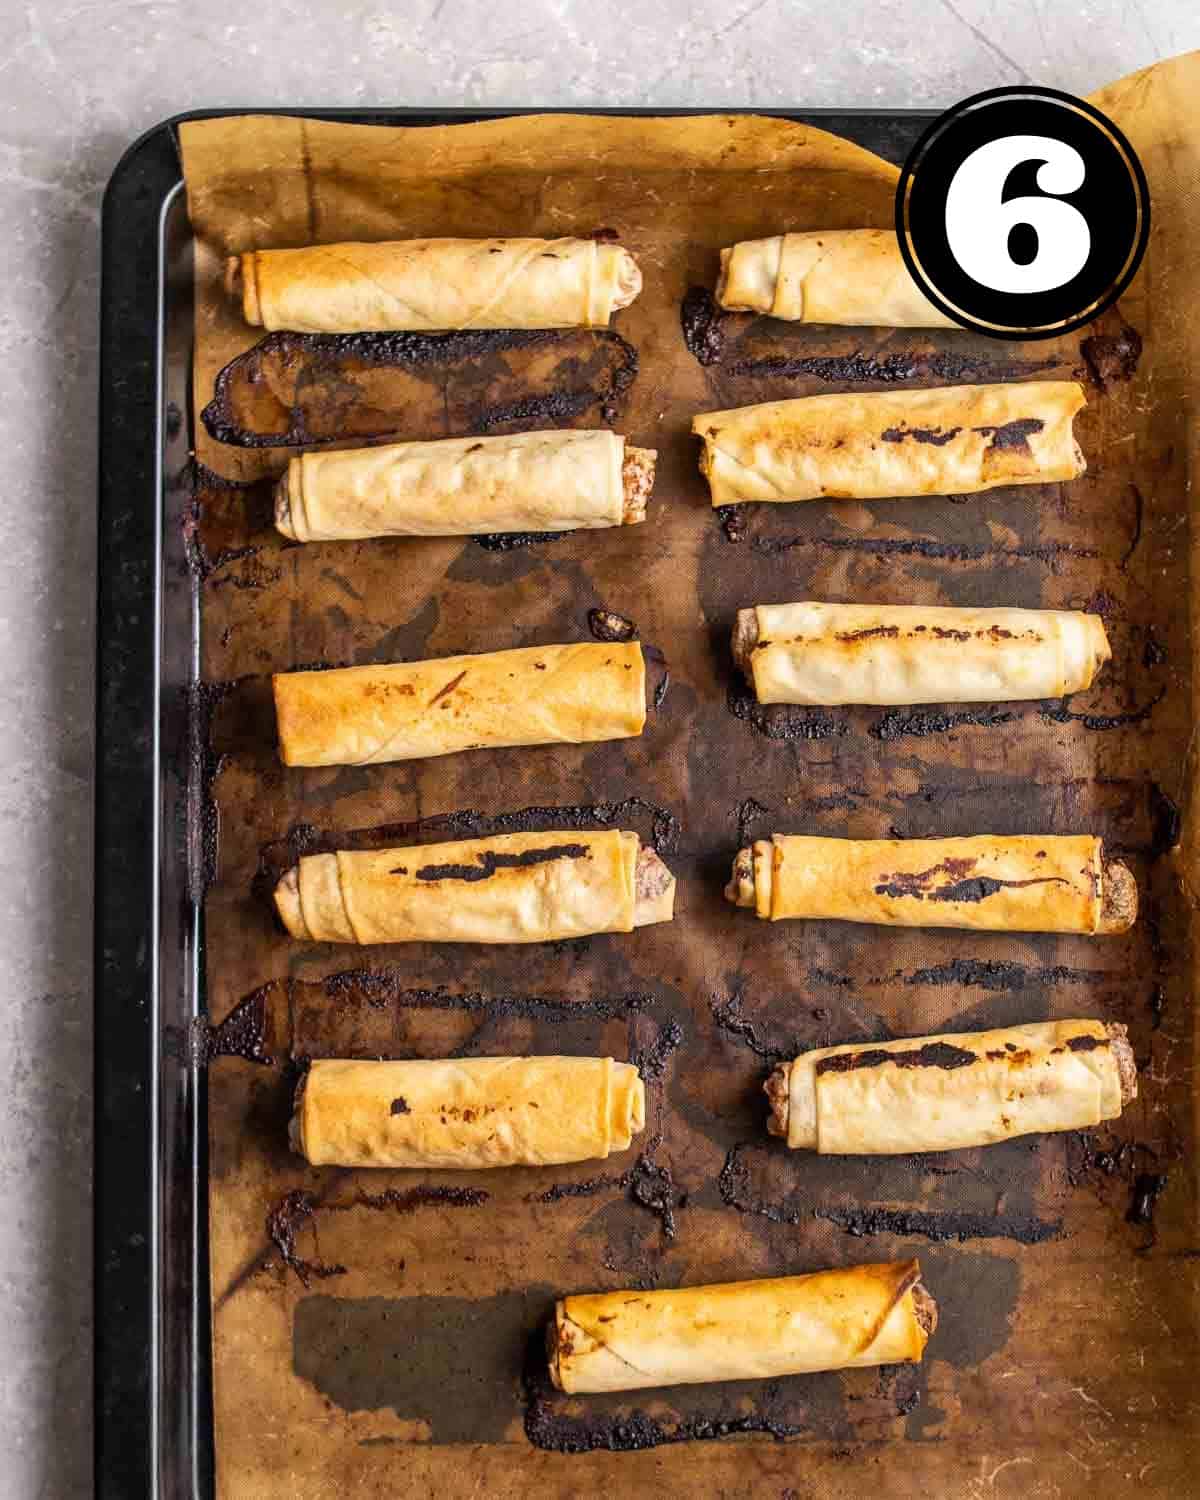
Step 6: Bake for 15 minutes, then turn them over and bake for another 10-15 minutes, or until golden brown.
⏲️Other ways to cook lumpia
Air fryer - Cook them in an air fryer for 10-12 minutes at 200 °C/400°F until golden and crispy.
Deep frying - Heat 1 inch of oil in a saucepan. Drop the lumpia and fry for around 1-2 minutes each side, or until golden. Remove from the pan, then transfer them to a wire rack to drain off excess oil.
✔Helpful tips
- Taste testing filling - To ensure the filling is salty enough, you could fry up a small spoonful of the filling. Taste and adjust the seasonings from there.
- Avoid overfilling lumpia - Around 2-3 tablespoons of filling per lumpia is the sweet spot. Overfilling will cause it to split open easily during cooking.
- Cover unused wrapper - When wrapping lumpia, keep the unused wrappers covered with a damp kitchen towel to prevent them from drying out.
- Sealing lumpia with slurry - If water alone does not create a secure seal, use a cornstarch slurry by combining 1 tablespoon of cornstarch with 1 tablespoon of water.
- Temperature of oil - If frying, the temperature of the oil should be around 350°F (180 °C). If the oil is too hot, lumpia will brown too quickly before the filling is cooked through.
❄Storing suggestions
When making vegan lumpia shanghai, I tend to double the ingredients to make a larger batch for later. You can either store lumpia cooked or uncooked.
Fridge - Place lumpia in a sealed container or Ziploc bag. Refrigerate them for 2-3 days. Reheat in the oven or air fryer at 200 °C/400°F for 5-8 minutes, or until hot.
Freezer - Arrange vegan lumpia on a lined baking sheet, ensuring they are not touching. Freeze for 1 hour until solid, then transfer them to a freezer bag. They can be frozen for 3 months.
Lumpia can be reheated from frozen at 200 °C/400°F for 10-15 minutes in the oven, or air fryer for 6-8 minutes. Or, you could deep fry them for 2-3 minutes on each side.

Save this recipe!
Also get a FREE high-protein vegan recipe eBook + weekly new recipes! Unsubscribe anytime.
🍜How to serve
Dips - Serve them alongside classic dips such as Thai chili sauce, sweet and sour sauce, banana ketchup, or spicy teriyaki sauce. If creamy dips are your thing, give my vegan sriracha mayo a try!
With Asian mains - Vegan lumpia pairs well with various Asian mains. I especially love pairing it with tofu adobo or vegan sisig.
For parties and gatherings - Serve it alongside other dips and party foods, including my paprika hummus, air fryer oyster mushrooms, and tofu lettuce wraps.


📖 Recipe

Vegan Lumpia Shanghai
Ingredients
- 1 lb plant-based ground meat or extra-firm tofu (see notes)*
- 3 cloves garlic minced
- 1 medium carrot shredded
- ½ medium yellow onion
- 1 tablespoon soy sauce or tamari
- salt and pepper to taste
- 24 sheets lumpia wrappers or spring roll wrappers (see notes)**
Instructions
- If you have decided to bake them, preheat oven to 200C/400f.
Making filling
- In a large bowl, combine together veggie ground, onion, garlic, carrot, soy sauce, salt and pepper. Mix to combine.
Wrapping lumpia
- Place the wrapper in such a way that a corner is facing you. Spoon about 2 tablespoons of mixture onto the wrapper, about 2 inches from the edge closest to you.
- Fold the corner facing you up, then fold in both edges like making a burrito. Tightly roll it up into a log.
- Wet the last inch of wrapper by brushing on some water using your fingers. (I usually keep a small container of water near me to wet my fingers) Repeat for the remaining filling.
To bake
- Brush on some oil, or spray lumpia with some cooking spray.
- Arrange lumpia onto a lined baking sheet and bake for 15 minutes.
- Turn them over and bake for another 10-15 minutes or until golden.
Cooking in air fryer
- Brush on some oil, or spray lumpia with some cooking spray.
- Cook for 10-12 minutes at 200C/400F, or until they are brown and crispy.
Deep-frying
- Heat about 1 inch of cooking oil in a frying pan or shallow saucepan over medium heat until small bubbles start to form, or until it reaches a temperature of 180 °C/250°F.
- Add a few lumpia into the pan, and fry for around 2 minutes on each side or until golden.
- Using a slotted spoon, gently remove them from the pan and transfer them to a wire rack set over a baking sheet to drain off excess oil.
- Let vegan lumpia cool down for 5 minutes or so before enjoying them.
Notes
- Taste testing filling - To ensure the filling is salty enough, you could fry up a small spoonful of the filling. Taste and adjust the seasonings from there.
- Avoid overfilling lumpia - Around 2-3 tablespoons of filling per lumpia is the sweet spot. Overfilling will cause it to split open easily during cooking.
- Cover unused wrapper - When wrapping lumpia, keep the unused wrappers covered with a damp kitchen towel to prevent them from drying out.
- Sealing lumpia with slurry - If water alone does not create a secure seal, use a cornstarch slurry by combining 1 tablespoon of cornstarch with 1 tablespoon of water.
Save this recipe!
Also get a FREE high-protein vegan recipe eBook + weekly new recipes! Unsubscribe anytime.
Nutrition
Nutrition info calculated is just a rough estimate and is provided as a courtesy. Bear in mind that value will vary based on variables like specific brand or type of product used. To obtain the most accurate representation, it is highly recommended that you calculate it on your own with the actual amount and type of ingredient used.


Join the discussion !