

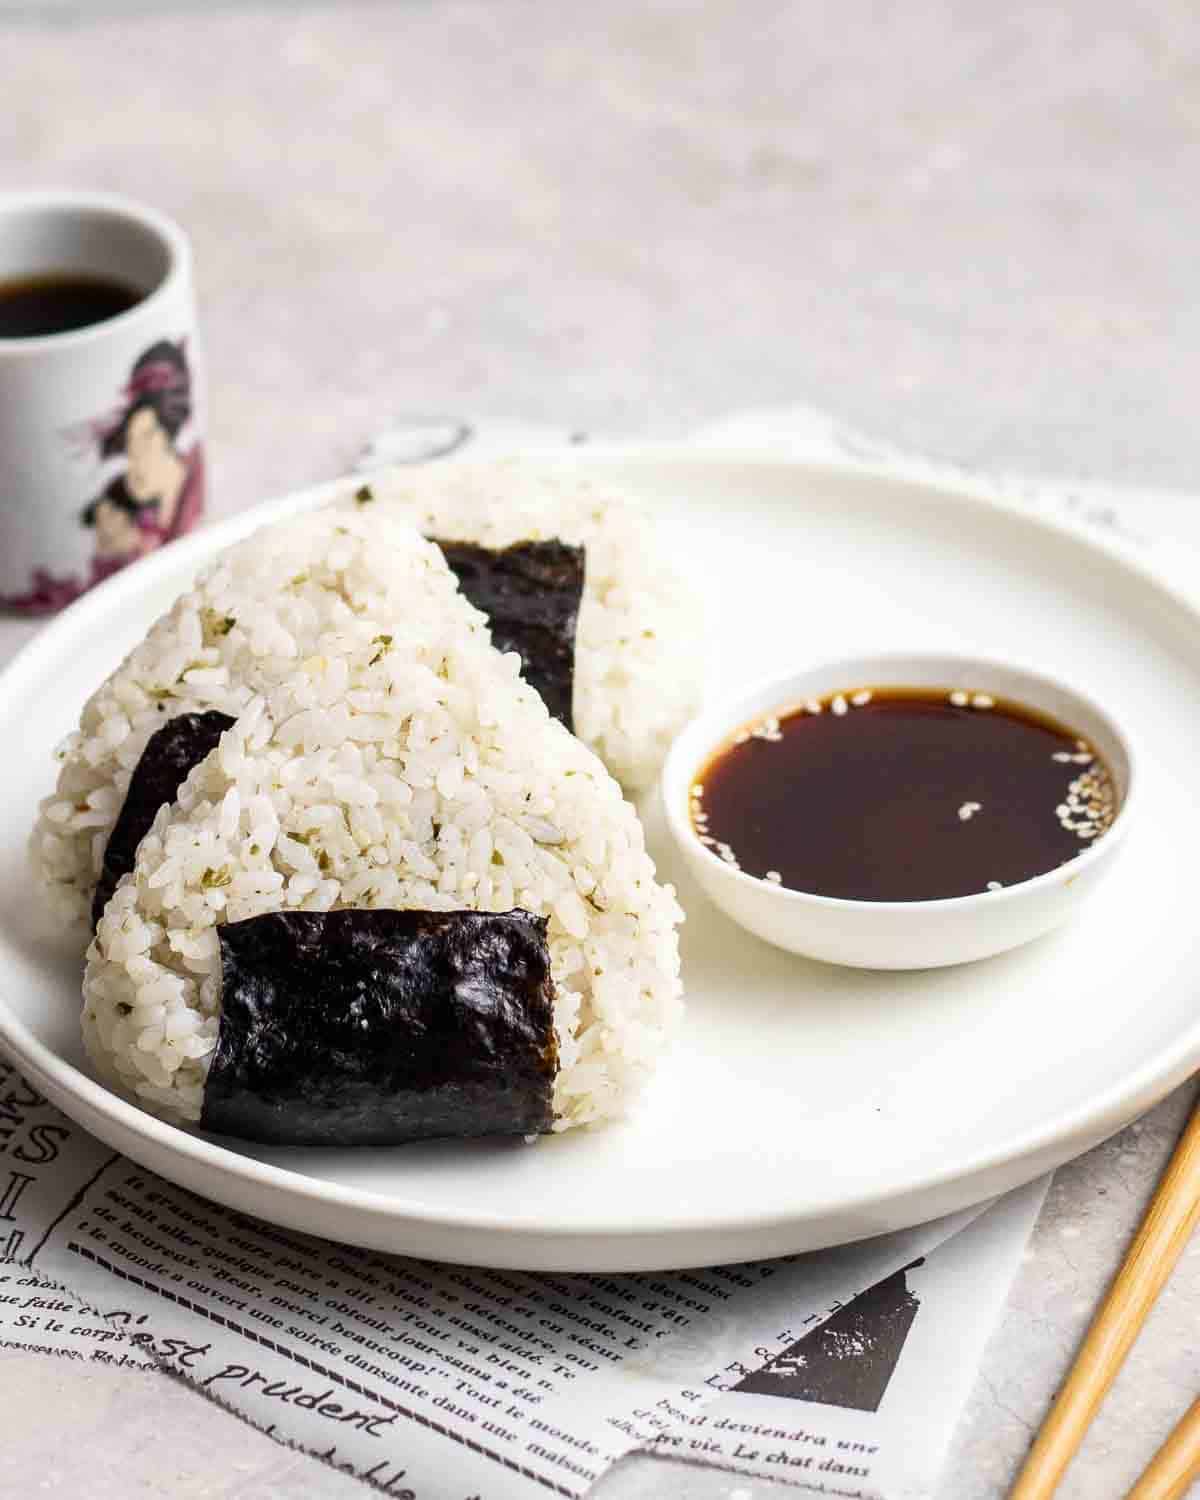
These vegan onigiri, or Japanese rice balls, are easy to make, tasty, and filling! They make a great lunchbox meal or a quick snack. This simple recipe is also highly customizable too!
I love serving it with a side of soy sauce or spicy teriyaki sauce for dipping.

Homemade onigiri taste so much better and fresher than store-bought ones, in my opinion! The best part is, I get to add in and fill them with whatever I fancy. It has been such a massive hit in our household, and even my non-vegan family adores them.
Plus, like my vegan kimbap, they transport well, making vegan onigiri an excellent filler for lunchboxes. I also like to bring a couple of them on the go with me as an easy snack.
🤔What is onigiri
Onigiri, sometimes also known as omusubi or Japanese rice balls, is a popular Japanese food made from seasoned Japanese rice shaped into a round or triangular shape. They are then commonly wrapped in a layer of nori.
Most onigiri are filled with some sort of fillings, the most common being pickled plum, salted salmon, and shredded chicken. With that being said, you can fill it with whatever you fancy. (Leftover dishes work exceptionally great!)
I have included a list of vegan fillings if you are looking for some inspiration.
💚Why you will love this recipe
- A crowd pleaser - This vegan onigiri will satisfy even the pickest of eaters! A kid-friendly and versatile recipe that your whole family will love.
- Simple and easy to make - All you need are some Japanese rice, salt, nori sheets and optionally, furikake (seaweed seasoning) to make this vegan onigiri. Mix all ingredients together, shape them, and they are ready to be enjoyed!
- The perfect portable meal or snack - They are non-messy, transports well, and can be eaten either warm, cold or at room temperature. You can easily pack a few with you to school or work!
- Highly customizable - You can easily adapt them by adding whatever ingredients or fillings that sounds good.
🍚How to cook Japanese rice
You can choose to cook your Japanese short-grain rice in a rice cooker, Instant pot, or in a pan on the stove. Regardless of whichever way you decide to cook your rice, first rinse them thoroughly in a fine mesh colander under running water for a good few minutes.
Rice cooker - The ratio of rice to water is 1:1. In this recipe, we will be using 1 cup of rice; hence 1 cup of water is needed. Place them both into the rice cooker, and cook according to the "white rice" setting.
Instant pot - Similarly, the ratio is 1:1. Pour in your 1 cup of rinsed rice along with 1 cup of water into the inner pot. Seal the lid, and cook at high pressure for 5 minutes. Allow the pressure to release naturally for 10 minutes before quick releasing the remaining pressure.
Stovetop - For every cup of rice, you would need 1 ¼ cups of water. Place water and rice in a large saucepan. Bring mixture to a boil, then lower heat to a gentle simmer.
Cook for 15-18 minutes with the lid on, or until the rice absorbs most water. Remove from heat and let it rest, covered for another 10 minutes. It is ready to be used.
🍣What you will need

📃Ingredients notes and substitutions
- Japanese short-grain rice - Also known as Koshihikari rice. It is the key ingredient in making onigiri.
- I would not recommend swapping it with other variety of rice.
- You can cook them either by using a rice cooker, Instant pot, or on stove. Check out the section above on "how to cook Japanese rice" for the full detailed instructions.
- Furikake - An optional ingredient. It is essentially a seasoning made from toasted sesame seeds and seaweed.
- Nori sheets - Also an optional ingredient. You can wrap it on onigiri however you like. For me, I choose to cut them into rectangular pieces, then wrap the rice balls from front to back, as shown in the pictures.
Save this recipe!
Also get a FREE high-protein vegan recipe eBook + weekly new recipes! Unsubscribe anytime.
🔪How to make
Transfer freshly cooked rice into a large bowl. Add in salt and furikake. Mix until everything is well combined.

Wet your hands, and rub on a small pinch of salt. Scoop up about ½ cup of rice mixture.
If you are using filling, make an indent at the center of the mixture, and spoon on ½-1 tablespoon of filling. Fold over the rice to cover the filling.

Shape dough into a ball. You can stop at this step if you want to make round onigiri. To make triangular ones, gentle press the rice mixture into a triangular shape using your fingertips while rotating until you are satisfied with its shape.

Add on a sheet of nori right before serving your vegan onigiri.
✔Helpful tips
- Make sure to use freshly cooked rice that is still fairly warm. It is easier to shape and work with when compared to cold, dry rice.
- Wet your hands when shaping onigiri. I like to keep a bowl of water near me, or be near a sink while making them.
- Press rice balls gently, but with sufficient pressure. This ensures that they do not fall apart easily.
- Alternatively, you could use a mold to shape your onigiri. All you have to do is to scoop some rice into the mold, and press the lid on gently. You can purchase onigiri mold online though Amazon.
- Wrap on the nori sheet right before serving to prevent them from turning soggy.
✨Variations and filling ideas
Seasonings - You can mix in seasonings other than what this recipe calls for, like rice vinegar, sesame oil, toasted sesame seeds, or goma shio (black sesame salt).
Edamame - Mix some shelled edamame into your rice mixture for some extra color and texture.
Vegan yaki onigiri -Brush on some oil and pan-fry them for 1-2 minutes on both sides. Then, brush on some soy sauce or teriyaki sauce and return them to the pan, cooking for another 1 minute on each side. The result? Onigiri that is crispy on the outside but moist and soft on the insides!
Vegan onigiri fillings
- Vegan tuna salad
- Wakame seaweed salad
- Shiitake or button mushrooms sauted in some soy sauce and garlic
- Pickled fruits or vegetables - pickled plum, cabbage, sauerkraut
- Natto (fermented soybeans)
- Kimchi
- Leftovers like sweet and sour chickpeas, curry tofu scramble or tofu mince
❄Storing and reheating suggestions
Storing - Wrap vegan onigiri using plastic wrap, and place them in a sealed container or freezer bag. They can be refrigerated for 3-4 days and frozen for up to a month.
Reheating - To reheat, wrap the onigiri with a damp paper towel, and microwave it at 15 seconds burst, or until it is thoroughly warmed. For frozen ones, you do not have to thaw them; just microwave them for longer.
Or, you can make yaki onigiri by pan-frying them until golden. The detailed instructions are in the "variations and filling ideas" section above.
❔Commonly asked questions
The best type of rice to use is Japanese short-grain rice or Koshihikari rice.
Traditionally, the rice used to make onigiri is only seasoned with salt, sometimes with furikake, or seaweed seasoning. Rice vinegar is not used.
However, if you like the taste of rice vinegar, you can add some to your rice mixture!
You can eat onigiri cold, but the rice might turn dry and brittle if they have been refrigerated for quite a while. For dry ones, you can wrap them in a damp paper towel and microwave them for 20-40 seconds, or until they are warm and moist again.
Ensure that you are using the right kind of rice, which is Japanese short-grain rice, to make onigiri.
If your rice has been left out for too long and has turned cold, it will be harder for you to shape your onigiri. To fix this, microwave the rice slightly or until warm.


📖 Recipe

Easy Vegan Onigiri
Ingredients
- 1 cup uncooked Japanese short-grain rice aka koshihikari
- salt to taste
- 1 tablespoon furikake (optional)
Optional fillings
- natto
- wakame seaweed salad
- kimchi
- vegan tuna salad
Instructions
Cooking rice
- Rice cooker - The ratio of rice to water is 1:1. In this recipe, we will be using 2 cups of rice; hence 2 cups of water are needed. Place them both into the rice cooker, and cook according to the "white rice" setting.Instant pot - Similarly, the ratio is 1:1. Pour in your 2 cups of rinsed rice along with 2 cups of water into the inner pot. Seal the lid, and cook at high pressure for 5 minutes. Allow the pressure to release naturally for 10 minutes before quick releasing the remaining pressure.Stovetop - For every cup of rice, you would need 1 ¼ cups of water. Hence, you will need 2 ½ cups of water for 2 cups of rice. Place water and rice in a large saucepan. Bring mixture to a boil, then lower heat to a gentle simmer.Cook for 15-18 minutes with the lid on, or until the rice absorbs most water. Remove from heat and let it rest, covered for another 10 minutes. It is ready to be used.
Making onigiri
- Transfer freshly cooked rice into a large bowl. Add in salt and furikake. Mix until everything is well combined.
- Place a bowl of water near you. Wet your hands, and rub on a small pinch of salt. Scoop up about ½ cup of rice mixture.
- If you are using filling, make an indent at the center of the mixture, and spoon on ½-1 tablespoon of filling. Fold over the rice to cover the filling.
- Shape dough into a ball. You can stop at this step if you want to make round onigiri. To make triangular ones, gentle press the rice mixture into a triangular shape using your fingertips while rotating until you are satisfied with its shape.
- Add on a sheet of nori right before serving.
Notes
- Make sure to use freshly cooked rice that is still fairly warm. It is easier to shape and work with when compared to cold, dry rice.
- Press rice balls gently, but with sufficient pressure. This ensures that they do not fall apart easily.
- Alternatively, you could use a mold to shape your onigiri. All you have to do is to scoop some rice into the mold, and press the lid on gently. You can purchase onigiri mold online though Amazon.
- Wrap on the nori sheet right before serving to prevent them from turning soggy.
- You can fill onigiri with whatever you like! For more filling ideas, check out the section "variations and fillings ideas" above.
Save this recipe!
Also get a FREE high-protein vegan recipe eBook + weekly new recipes! Unsubscribe anytime.
Nutrition
Nutrition info calculated is just a rough estimate and is provided as a courtesy. Bear in mind that value will vary based on variables like specific brand or type of product used. To obtain the most accurate representation, it is highly recommended that you calculate it on your own with the actual amount and type of ingredient used.


Mimi says
Is there a plant based furikake?
Meesha says
Yes, there is! Here is the one I am using - https://amzn.to/3qe9xG2
Mimi says
Thank you!!